Vor einiger Zeit hatte ich meine kleine “Fun with TAGs” Reihe gestartet mit einem “Mechanics” TAG. Jetzt brachte mich Tim Holtz darauf, wieder mal spontan und ohne tieferen Sinn, einfach mit vorhandenen Materialien zu experimentieren. Dabei ist mein “Set Sail” TAG herausgekommen…
Some time ago I started my little “Fun with tags” series with a “Mechanics” tag. Now, Tim Holtz made me experiment with my materials again, spontaneously and without a deeper meaning. And this is what this lead to…
Distress Crayons Herausforderung / Distress Crayons challenge
Der Meister der Distress Inks ist – genau wie Millionen anderer – derzeit daheim und kann nicht reisen, um Workshops zu geben. So schlimm das ist, es gibt auch eine gute Seite: Er macht nämlich Facebook Lives an den Samstagen. Übrigens kann man die auch anschauen, ohne bei Facebook registriert zu sein. Einfach über seine Homepage. Und so haben auch wir, die wir eher nicht in den Genuß einer persönlichen Lehrstunde kämen, etwas davon. Dabei beschäftigt er sich nicht nur mit den allerneusten Distress Produkten, sondern holt auch alte Produkte noch einmal hervor und zeigt, was man damit machen kann.
The Master of Distress Inks is – equal to millions of other people – at home without being able to travel anywhere for teaching classes. On one side this is bad, but on the other side it is good: Currently he does Facebook Lives on Saturdays. You can watch them, even if you have not Facebook account. Just go on his homepage. Most probably we all won’t have the opportunity to participate in a personal lesson with him, so we benefit from this situation. He does not only teach things to do with latest Distress products, but grabs older ones and shows various applications.
Selbst aktiv werden / Spring into action
Ich habe mir die Sendung zum Thema Distress Crayons angeschaut. Der Meister selbst sagt ausdrücklich, wir sollen nicht nur kreative Videos SCHAUEN, sondern auch selbst kreativ ARBEITEN.
I watched the Distress Crayons show. The master himself says, we should not only WATCH creative videos, but BE creative ourselves.

So habe ich mir die paar Stifte geschnappt, die ich in meinem Fundus habe und habe einfach mal angefangen. Allerdings – zunächst war mein Tun nicht von Erfolg gekrönt…
So, I grabbed those few crayons I have in my stash and simply started to play. However, first of all my efforts weren’t successful…
Scheitern Teil 1 / Fail part 1
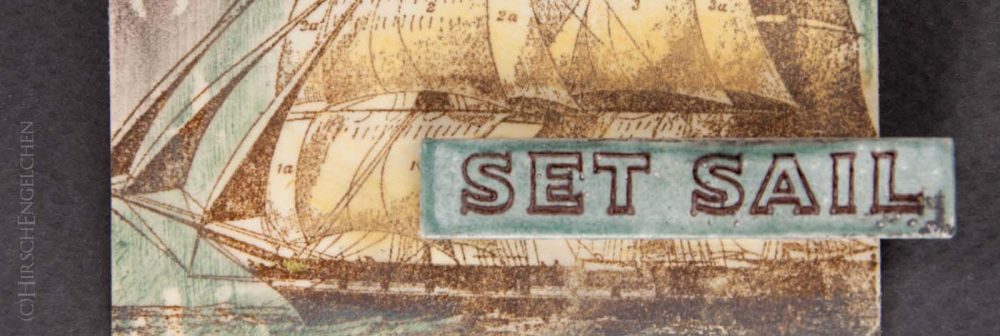
Da ich überwiegend nur gedeckte Farben der Crayons habe, mußte ich mir etwas einfallen lassen. Aged Mahogany und Iced Spruce haben mich dann zu etwas Maritimem inspiriert. Beim Blick in meinen Stempelfundus habe ich mir das Barometer, das Segelschiff und den Hummer geschnappt und mit Distress Archival Vintage Photo auf ein Distress Heavystock Tag gestempelt.
Because I only have some muted colors, I had to come up with something. Aged Mahogany and Iced Spruce inspired me to do something maritime. Digging through my stamps, I found a barometer, the sailing boat and the lobster and stamped them with Distress Archival Vintage Photo on a Distress Heavystock Tag.

Danach habe ich dem Meister folgend Distress Collage Medium auf dem kompletten Tag aufgetragen und damit versiegelt. Anschließend sollte man mit den Crayons Farbpartien aufscribbeln und mit dem Finger verwischen. DAS ging bei mir allerdings gehörig schief. Die Farbflächen wollten sich nicht so schön verschmieren lassen wie beim Boss und heraus kam der Mist da oben. Das konnte ich nicht auf mir sitzen lassen. Also, Restart….
Following the master, I applied Distress Collage Medium onto complete tag to seal it. Afterwards you should scribble on some crayon colors and smudge them with your fingers. THAT indeed went totally wrong on mine. Those colors did not let them smear easily like the boss showed and as a result I had that bunch of bull above. I did not want to put up with this. So, restart….
Auf ein Neues / Let’s try again
Die Vorgehensweise war beim zweiten Versuch die Gleiche. Aber diesmal habe ich noch mehr darauf geachtet, daß genügend Collage Medium aufgebracht wurde. Dann habe ich das Medium auch gründlich mit dem Heißluftfön getrocknet.
Procedure was the same on second try. But this time I paid attention to apply enough Collage Medium. I dried it thoroughly with a heat tool.

Ich habe mit den Stiften Iced Spruce, Aged Mahogany, Antique Linen und Hickory Smoke gearbeitet. Beim Auftragen der Crayons habe ich darauf geachtet, immer nur kleine Bereiche einzufärben und SOFORT zu verschmieren. Weil die Farbe sonst zu schnell trocknet und dann nicht mehr verrieben werden kann. Und siehe da: Das Ergebnis war besser!
I used Iced Spruce, Aged Mahogany, Antique Linen and Hickory Smoke crayons and explicitly paid attention to ink small areas and smudge them IMMEDIATELY. Because otherwise the color would dry too quickly and can’t be smeared any more. And voilà: A better result!
Das i-Tüpfelchen / Icing on the cake
Trotzdem fand ich das Ganze noch etwas langweilig. Da kam mir der nächste Tipp vom Meister ganz recht: Die Crayons sind nach dem Auftragen zwar letztlich wischfest, aber immer noch wasserreaktiv. Also passende Schablonen herausgesucht und die “Lifting” Methode angewandt: Mit einem feuchten Tuch durch die Schablone die Farbe wieder wegtupfen und das helle TAG kommt wieder zum Vorschein.
Anyway, I found it somehow still boring. So, another hint from the master was helpful: Those crayons are smear-resistant in the end, but always water reactive. So, grabbing some stencils and using the “lifting” method: Dabbing the color away with a damp cloth through the stencil and the light base color of the tag reappears.

Jetzt war ich schon sehr viel zufriedener mit dem Ergebnis. Der Trick hat die langweiligen Farbflächen interessant gemacht. Fehlt nur noch das Motto für’s TAG: Set Sail.
This time I was much more satisfied with the result. That trick brought interest to those color areas. Now, the tag’s motto was missing: Set sail.
Scheitern Teil 2 / Fail part 2
Nun wollte ich noch eine Technik anwenden, die Tim mit den Crayons gezeigt hat. Dazu muß man zunächst mit den neuen Distress Embossing Glazes eine Oberfläche versiegeln. Das soll aber nur partiell sein, also ein nicht ganz deckende Schicht. Meine sah nach dem ersten Auftrag von Puder und anschließendem Erhitzen auf einem Holzstückchen aus wie Wassertropfen.
Now I wanted to use another of Tim’s crayon techniques. First you will have to seal a surface with those new Distress Embossing Glazes. This should be only partial, not completely covered. Mine ended up like water droplets after first coat of powder and heating.

Also habe ich noch eine Schicht aufgebracht, was an sich kein Problem war. Anschließend habe ich – genau wie gezeigt – mit einem Crayon eine dunkle Farbe aufgetragen, mit dem Finger eingerieben und die Oberfläche anschließend mit einem Papiertuch abgewischt.
So, I did a second run, no problem by itself. Next I applied a dark color crayon – exactly as shown, rubbed it with my fingers and wiped the surface with a paper towel.

Das Ergebnis war allerdings nicht so, wie ich es mir vorgestellt hatte. Das sah irgendwie merkwürdig aus und es war auch keine gute Basis für den Stempel, den ich mir dafür noch ausgesucht hatte. Also weg damit und neu.
This wasn’t the intended result. It looked somehow strange and it was no good foundation for stamping. Well then, got rid of it and doing it again.
Das Ganze nochmal / Same again
Also noch ein Holzstückchen passend sägen, weiß grundieren und die Embossing Glaze Basis drauf. Um sich nicht die Fingerchen zu verbrennen ist eine Pinzette äußerst hilfreich….
Another wooden piece sawn, primed in white and based with Embossing Glaze. To avoid burning your fingers a tweezer comes in very handy…

Diesmal klappte es deutlich besser und ich habe darauf geachtet, daß die Oberfläche auch besser abgedeckt ist. Sieht ein bißchen aus wie eine glasierte Fliese, oder?
This time it went better and I explicitly paid attention to cover the surface. Looks a bit like a glazed ceramic tile, doesn’t it?
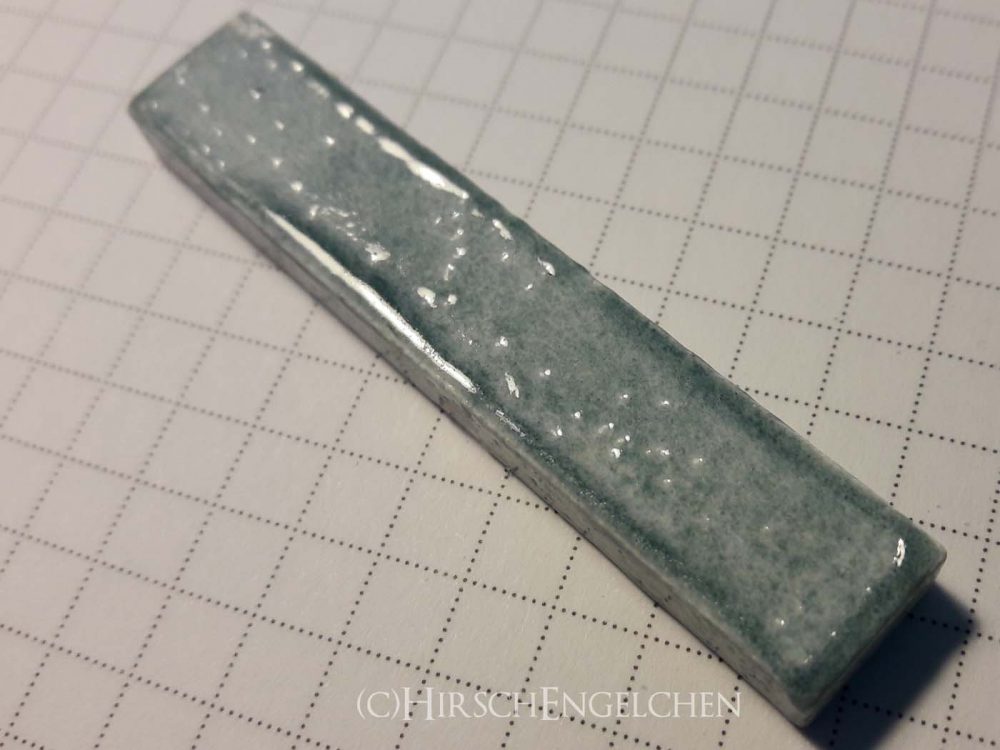
Ich habe auch einen nicht ganz so dunklen Crayon zum Akzentuieren genommen und schon ging es wesentlich besser.
I used a lighter crayon for the accents and it was much better.

Das Ergebnis hat wirklich ein bißchen was von gealterter Fliese…
The result really looks like an old ceramic tile…

Hier seht ihr nochmal den Vergleich:
Here you can see the comparison:

Oben das mißlungene Teil. Unten der fertige Stick mit dem aufgestempelten “Set Sail” Schriftzug für das TAG. Dafür habe ich übrigens StazOn genommen, denn nur eine permanente Stempelfarbe hält auf dem Embossing.
At the top that failed item. Below finalized stick with “Set Sail” writing for the tag. By the way, I used StazOn for that, because only a permanent ink will last on embossing.
Die dritte Dimension / Third dimension
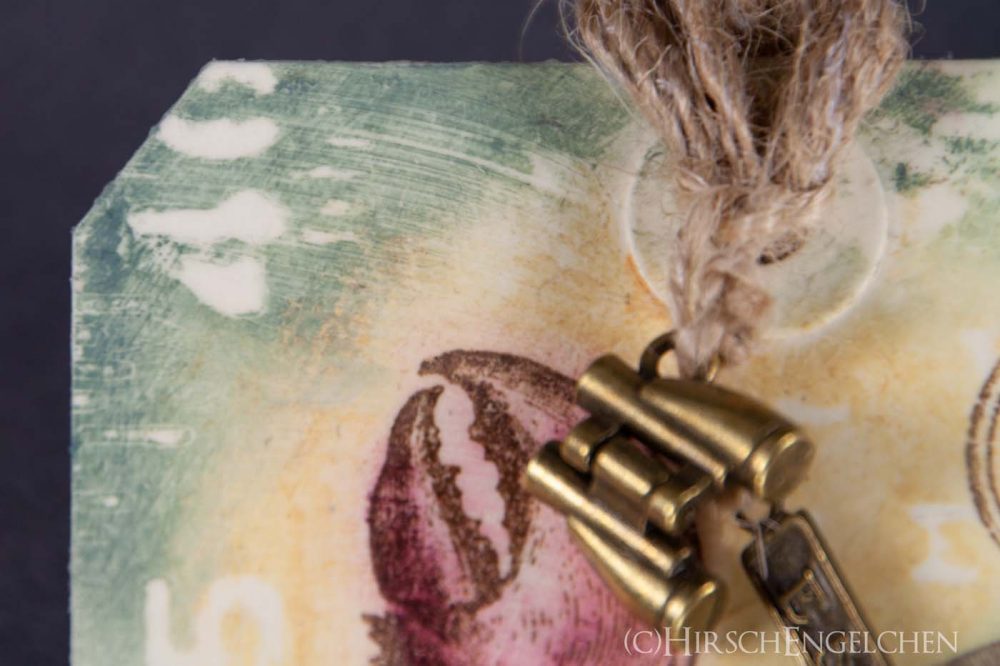
Der Stick fand dann seinen Platz unten auf dem TAG um etwas Dimension zu bringen.
That stick found it’s place on the bottom of the tag to provide some dimension.

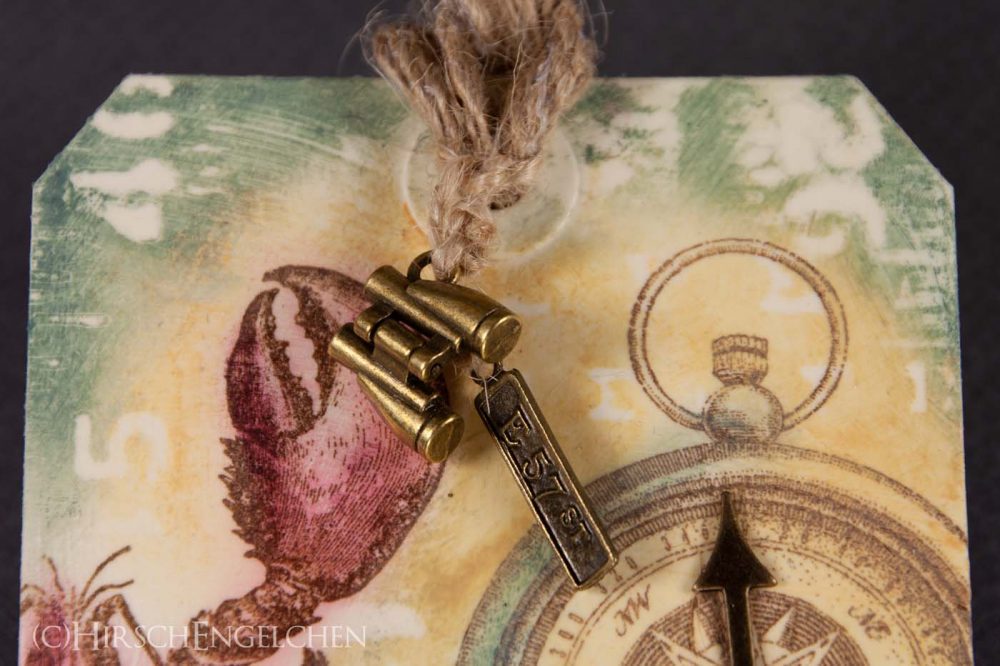
Natürlich durften auch ein paar Metallcharms nicht fehlen. Ein Storystick und ein Fernglas baumeln am Schleifchen.
Of course some metal charms were needed. A storystick and a small spyglass dangles on the bow.
Ende gut, alles gut / All’s well that ends well
Das Barometer bekam einen “echten” Zeiger. Und damit war das Set Sail TAG dann auch komplett.
The barometer was equipped with a “real” hand. With that the Set Sail tag was completed.
Am Ende bin ich doch zufrieden mit dem Ergebnis. Und das, obwohl ich ja doch so einige Startschwierigkeiten hatte… Wie findest du mein Set Sail TAG? Hast du auch schon eine Anregung von Herrn Holtz umgesetzt? Ich bin gespannt!
I am satisfied with the result in the end. Surprisingly, because I had a lot of difficulties in the beginning… How do you like my Set Sail tag? Have you been inspired by Mr. Holtz’s ideas, too? I am curious!
Liebe Grüße vom HirschEngelchen
Hugs from HirschEngelchen
Anka
TAG: Distress Heavystock
Stamps: KaiserCraft, LaBlanche
Colors + Mediums: Distress Crayons, Distress Embossing Glaze, StazOn, Distress Archival Ink, Distress Collage Medium
Stencil: Stampers Anonymous
Metal charms: Idea-Ology